
Let's talk about adding some cool social share buttons on Gatsby blog pages. For this we will be using react-share.
Install react-share
It is as simple as
yarn add react-shareModify configuration
Now we need to know about site's URL and a few other things for social sharing to work.
So let's edit our gatsby-config.js file and put the URL in the siteMetadata.
module.exports = {
	siteMetadata: {
		// ...
		twitterHandle: '@swashata',
		url: 'https://swas.io',
		// other metadata
	},
	// ... other stuff, like plugin
};
Create Social Component
Now let's create a React Component which will show the share buttons. Creating a component instead of adding the code directly is a great way to show share buttons where ever you like, for example, archive pages, single pages etc.
Create a file src/components/Share.jsx and put the following code.
import React from 'react';
import PropTypes from 'prop-types';
import { FontAwesomeIcon } from '@fortawesome/react-fontawesome';
import {
	FacebookShareButton,
	GooglePlusShareButton,
	LinkedinShareButton,
	TwitterShareButton,
	WhatsappShareButton,
	RedditShareButton,
} from 'react-share';

import './Share.scss';

const Share = ({ socialConfig, tags }) => (
	<div className="post-social">
		<FacebookShareButton
			url={socialConfig.config.url}
			className="button is-outlined is-rounded facebook"
		>
			<span className="icon">
				<FontAwesomeIcon icon={['fab', 'facebook-f']} />
			</span>
			<span className="text">Facebook</span>
		</FacebookShareButton>
		<TwitterShareButton
			url={socialConfig.config.url}
			className="button is-outlined is-rounded twitter"
			title={socialConfig.config.title}
			via={socialConfig.twitterHandle.split('@').join('')}
			hashtags={tags}
		>
			<span className="icon">
				<FontAwesomeIcon icon={['fab', 'twitter']} />
			</span>
			<span className="text">Twitter</span>
		</TwitterShareButton>
		<GooglePlusShareButton
			url={socialConfig.config.url}
			className="button is-outlined is-rounded googleplus"
		>
			<span className="icon">
				<FontAwesomeIcon icon={['fab', 'google-plus-g']} />
			</span>
			<span className="text">Google+</span>
		</GooglePlusShareButton>
		<LinkedinShareButton
			url={socialConfig.config.url}
			className="button is-outlined is-rounded linkedin"
			title={socialConfig.config.title}
		>
			<span className="icon">
				<FontAwesomeIcon icon={['fab', 'linkedin-in']} />
			</span>
			<span className="text">LinkedIn</span>
		</LinkedinShareButton>
		<RedditShareButton
			url={socialConfig.config.url}
			className="button is-outlined is-rounded reddit"
			title={socialConfig.config.title}
		>
			<span className="icon">
				<FontAwesomeIcon icon={['fab', 'reddit-alien']} />
			</span>
			<span className="text">Reddit</span>
		</RedditShareButton>
		<WhatsappShareButton
			url={socialConfig.config.url}
			className="button is-outlined is-rounded whatsapp"
			title={socialConfig.config.title}
		>
			<span className="icon">
				<FontAwesomeIcon icon={['fab', 'whatsapp']} />
			</span>
			<span className="text">WhatsApp</span>
		</WhatsappShareButton>
	</div>
);

Share.propTypes = {
	socialConfig: PropTypes.shape({
		twitterHandle: PropTypes.string.isRequired,
		config: PropTypes.shape({
			url: PropTypes.string.isRequired,
			title: PropTypes.string.isRequired,
		}),
	}).isRequired,
	tags: PropTypes.arrayOf(PropTypes.string),
};
Share.defaultProps = {
	tags: [],
};

export default Share;
Also create a src/components/Share.scss file and put the following.
$brand-colors: (
	facebook: #3b5998,
	twitter: #1da1f2,
	googleplus: #dd4b39,
	linkedin: #0077b5,
	reddit: #ff4500,
	whatsapp: #128c7e,
);

.post-social {
	.button {
		margin: 0.5rem 0.25rem;
		// transition: all 300ms ease-out;
		@each $class, $color in $brand-colors {
			&.#{$class} {
				color: $color;
				border-color: $color;
				&:hover {
					background-color: $color;
					border-color: $color;
					color: #fff;
				}
			}
		}
	}
}
PS: You do need the gatsby-plugin-sass.
Of course edit to your liking. Here the component basically requires two props:
socialConfig: An object of the mentioned shape to pass in our configuration data. We pass the commonurlandtitleinsideconfighash and a separatetwitterHandlefor twitter specific share.tags: Optional array of tags of the blog post. This is implementation specific. If you are not using any tags, then you can just leave it as is.
Also I am assuming you have some sort of FontAwesome setup.
Get data using graphql
Now depending on your setup, you need to edit the template component for your single blog pages.
We need to insert the query for getting the siteMetadata we had inserted before.
In my case, I am going to edit src/templates/blog-post.js
query BlogPostByID($id: String!) {
	site {
		siteMetadata {
			url
			twitterHandle
		}
	}
	post: markdownRemark(id: { eq: $id }) {
		id
		html
		frontmatter {
			title
			tags
		}
		fields {
			slug
		}
	}
}
Your mileage will vary here. I have assumed the following
- You are putting
title,tagsin the frontmatter. - You are adding the
slugfield to nodes. It can be done by the following snippet put directly ingatsby-node.js. We will need the slug to calculate the share URL.
const { createFilePath } = require('gatsby-source-filesystem');

exports.onCreateNode = ({ node, boundActionCreators, getNode }) => {
	const { createNodeField } = boundActionCreators;

	if (node.internal.type === `MarkdownRemark`) {
		const value = createFilePath({ node, getNode });
		createNodeField({
			name: `slug`,
			node,
			value,
		});
	}
};
A simple frontmatter may look like this.
---
title: Social Share button for Gatsby Blog Pages
date: 2018-06-04T10:41:18.083Z
tags: ["Gatsbyjs","JavaScript","Social"]

---

Let's talk about adding some cool social share buttons on [Gatsby](https://gatsbyjs.org) blog pages.
Use the data to add a Share component
Now that we have our data, let's add the share component we have created earlier.
In the same file (src/templates/blog-post.js), make modifications like this.
import React from 'react';
import Share from '../components/Share';

const BlogPost = ({ data }) => {
	// destructure and get our variables
	const {
		post: {
			html,
			frontmatter: { title, tags },
			fields: { slug },
		},
		site: {
			siteMetadata: { url, twitterHandle },
		},
	} = data;
	return (
		<div className="blog-post">
			<h1 className="title is-1">{title}</h1>
			<div
				className="content"
				dangerouslySetInnerHTML={{ __html: html }}
			/>
			<Share
				socialConfig={{
					twitterHandle,
					config: {
						url: `${url}${slug}`,
						title,
					},
				}}
				tags={tags}
			/>
		</div>
	);
};
If done correctly, it will now show up below your post content.
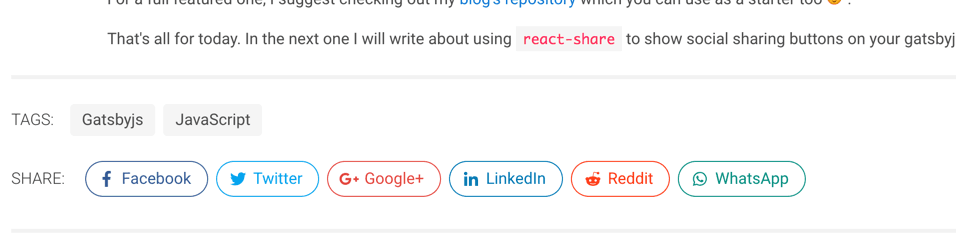
Quick Recap
So, to recap, we have implemented the social share button with the following strategy.
- Pass in the site URL and twitterHandle through
gatsby-config.jsfile. - Pass post
title,tagsetc through frontmatter. - Create a
slugfield onMarkdownRemarknodes. - Use
graphqlto query our needed data. - Pass the data to a custom component to create a set of sharing buttons.
- The custom components will use
react-shareto create the buttons.
That's all. Do comment and share if you like.